There is something universally comforting about a platter of freshly fried chicken. When done right, it stands as a true culinary masterpiece. The ideal version features a golden, deeply crusted exterior that shatters with an audible crunch, giving way to incredibly tender and flavorful meat underneath. It is a staple of comfort food across the globe, transcending borders and generations.
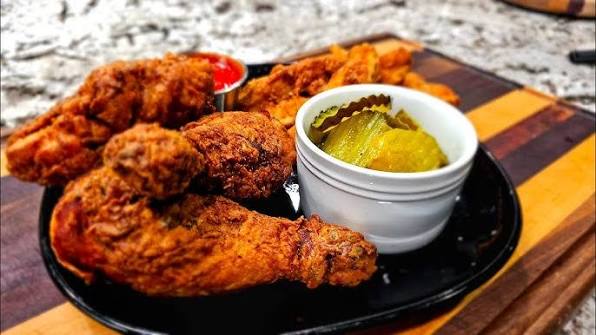
However, achieving the perfect balance between a shatteringly crisp crust and a drippingly juicy interior is an art form that eludes many home cooks. All too often, homemade fried chicken falls victim to common pitfalls like greasy coatings, bland meat, or crusts that slip right off the chicken.
The secret to conquering these challenges lies not just in the cooking technique but in a carefully guarded, multi-layered seasoning strategy. This comprehensive guide will take you through the science, the steps, and the exact secret seasoning blend required to create restaurant-quality crispy fried chicken right in your own kitchen.
The Philosophy of the Perfect Crunch
Before heating the oil, it is essential to understand what makes fried chicken truly exceptional. Great fried chicken relies on three fundamental pillars, including moisture retention, texture contrast, and deep flavor penetration.
Moisture retention ensures that the high heat of frying does not dry out the meat, particularly the leaner breast portions. Texture contrast is the interplay between the hard, crispy ridges of the exterior flour coating and the soft, succulent meat inside. Flavor penetration means that every single bite, from the very edge of the skin down to the bone, is seasoned perfectly.
To achieve these pillars, we do not simply throw seasoned flour onto raw chicken. We use a precise sequence of brining, dredging, and temperature-controlled frying. Each step builds upon the last, resulting in a harmonious final product that stays crispy long after it leaves the fryer.
Decoding the Secret Seasoning Blend
The heartbeat of this recipe is the secret seasoning blend. Many famous commercial establishments claim a legendary mix of herbs and spices, but the truth is rooted in a balance of savory, sweet, sharp, and earthy notes. The goal is to create a complex flavor profile that complements the natural richness of the chicken without overpowering it.
Our secret blend utilizes a combination of traditional spices elevated by key umami boosters. It consists of several vital components.
Smoked paprika provides a warm, woody base note and lends a gorgeous, rich golden-red hue to the finished crust. Garlic powder and onion powder form the aromatic backbone of the seasoning, offering a savory depth that mimics hours of slow roasting. Unlike black pepper, which delivers a sharp, immediate bite, white pepper provides a subtle, lingering heat that spreads across the palate.
Celery salt acts as the unsung hero of traditional frying, adding a distinct, nostalgic savoriness that bridges the gap between the spices. Dried oregano and thyme are gently crushed to release their volatile oils, introducing a faint, earthy freshness. Cayenne pepper adds just enough kick to stimulate the taste buds without making the dish overwhelmingly spicy. Finally, a small pinch of monosodium glutamate elevates the savory characteristics of the meat to extraordinary heights.
This seasoning mix is not confined solely to the flour coating. To maximize flavor, it is divided and introduced at multiple stages of the preparation process.
The Buttermilk Brine forms the Foundation of Juic.e
The journey to flawless fried chicken begins several hours before frying. Brining is a non-negotiable step because it fundamentally alters the cellular structure of the meat.
When chicken is submerged in a seasoned buttermilk bath, two critical reactions occur. First, the salt in the brine dissolves a portion of the protein filaments, allowing the meat to retain more moisture during the intense cooking process. Second, the natural lactic acid in the buttermilk acts as a gentle tenderizer, breaking down tough muscle fibers.
To prepare the brine, combine whole buttermilk with a generous tablespoon of the secret seasoning blend, a splash of pickle juice, and a couple of eggs. The eggs add richness and will later help the flour adhere securely to the skin. Submerge your chicken pieces, preferably a mix of bone-in, skin-on thighs, drumsticks, and breasts, fully into the liquid. Cover the container and refrigerate it. This patience will reward you with exceptionally juicy results.
The Dredging Technique for Maximum Ridges
The hallmark of great fried chicken is a crust filled with craggy, irregular ridges. Those ridges catch the oil, create extra surface area, and result in maximum crunch. Achieving this texture requires a specific dredging methodology.
Start with a large, shallow bowl filled with high-quality all-purpose flour. To enhance the crispness, mix a small amount of cornstarch or baking powder into the flour. Cornstarch interferes with gluten development, preventing the crust from becoming tough or leathery. Season the flour mixture heavily with the remaining secret seasoning blend.
First, remove a piece of chicken from the buttermilk brine, allowing the excess liquid to drip off for just a second. You want the chicken to remain thoroughly wet.
Second, drop the chicken into the seasoned flour. Use your hands to bury the chicken completely under the flour.
Third, press down firmly. Use the heels of your hands to pack the flour tightly onto the wet chicken. This forces the flour to combine with the wet buttermilk, creating small clumps.
Fourth, lift the chicken out of the bowl and shake it firmly. As you shake it, you will see a beautifully textured, flaky coating form on the surface.
Fifth, place the coated chicken onto a wire rack and let it rest for roughly ten minutes before frying. This resting period allows the flour to fully hydrate and bond with the chicken, ensuring the crust does not fall off in the hot oil.
Mastering the Fryer and Oil Dynamics
Even with perfect seasoning and flawless dredging, your fried chicken will fail if your oil management is careless. Frying is a delicate balance of heat control. If the oil is too hot, the exterior will burn to a crisp while the interior remains dangerously raw. If the oil is too cold, the chicken will absorb the liquid fat like a sponge, leaving you with a soggy, heavy mess.
The ideal oil for frying chicken must have a high smoke point and a neutral flavor profile. Peanut oil is the traditional gold standard, as it handles high temperatures gracefully and lends a clean finish. Vegetable oil, canola oil, or corn oil are excellent alternatives.
Pour enough oil into a deep cast-iron skillet or a heavy-bottomed Dutch oven to submerge the chicken pieces halfway. Heat the oil slowly over medium heat until it reaches a steady temperature.
When you add the chicken pieces to the hot oil, do so gently, working in batches. Never crowd the pan. Dropping too many cold pieces of chicken into the oil simultaneously will cause the temperature to plummet drastically. Maintain an active, steady frying temperature throughout the cooking process.
Timing, Doneness, and the Crucial Rest
As the chicken fries, you will observe a beautiful transformation. The pale flour coating will slowly morph into a deeply amber, bubbling crust. Turn the chicken pieces carefully using tongs every few minutes to ensure uniform coloring.
Cooking times vary depending on the specific cut of meat. Drumsticks and thighs generally take twelve to fifteen minutes, while thick chicken breasts may require slightly longer. However, relying purely on a timer is risky. The only foolproof method to guarantee perfect doneness is to use an instant-read digital meat thermometer.
Insert the probe into the thickest part of the meat, avoiding the bone. White meat is perfectly cooked and safe to eat when it registers a safe internal temperature. Dark meat benefits from a slightly higher final temperature, as it allows the connective tissues to melt fully, yielding a superior texture.
Once the target temperature is hit, remove the chicken from the oil immediately. Instead of placing the hot chicken onto paper towels, which traps steam underneath and sabotages your crispy crust, transfer the pieces to a clean wire cooling rack set over a baking sheet. This allows air to circulate entirely around the chicken, keeping the bottom just as crisp as the top. Let the chicken rest for five minutes to allow the interior juices to redistribute evenly before serving.
Common Mistakes to Avoid
To ensure your success every single time you attempt this recipe, keep these vital troubleshooting tips in mind.
Never drop chicken straight from the refrigerator into hot oil. The sudden temperature shock will unevenly cook the meat. Let the brined chicken sit at room temperature for about twenty minutes before dredging.
Skipping the ten-minute rest after dredging is the primary reason coatings separate from the chicken during frying. Give the flour time to form a cohesive batter layer on the skin.
Do not crank the stove to high heat to speed up the oil warming process. Slow, steady heating creates a more stable frying environment.
Conclusion and Final Thoughts
Mastering crispy fried chicken is a deeply satisfying culinary achievement. By prioritizing a thorough buttermilk brine, treating your flour coating with care to build those coveted crunchy ridges, and respecting the physics of oil temperature, you elevate a simple comfort dish into a culinary event.
The secret seasoning blend provides a rich complexity that keeps your guests reaching for piece after piece. With these detailed techniques in your culinary repertoire, you no longer need to rely on fast-food chains to satisfy your cravings. You hold the blueprint to the ultimate crispy fried chicken right in your own hands.